Tuesday, February 19, 2008

Nougatine

**for those of you reading...this was a blog entry that became a class assignment. The assignment came before I went to Nougatine, but I thought it would be easier for me to write if I was writing it first here. enjoy :)

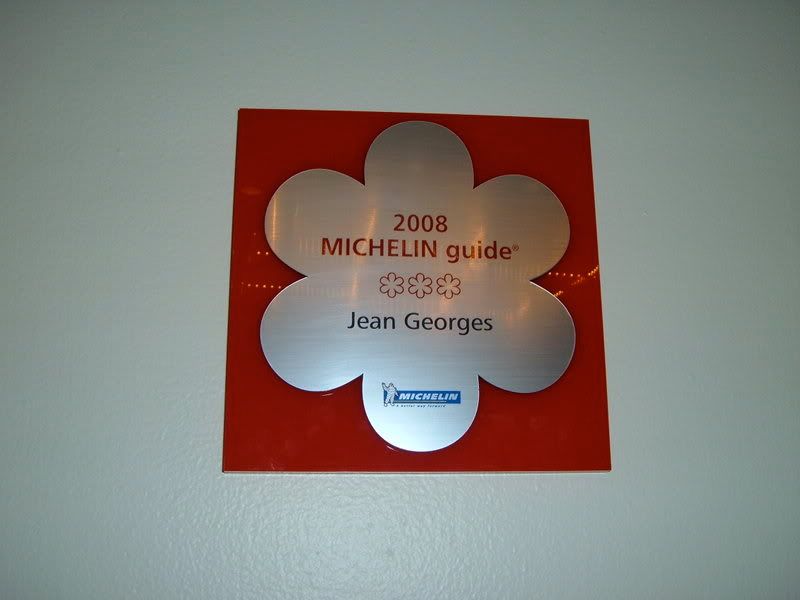
I entered Nougatine at Jean-Georges around 1:45pm on a Sunday afternoon. The less formal cafe-style front room to Jean-Georges at Trump Towers (Central Park West at Columbus Circle), Nougatine boasts around one-hundred seats stationed around clean, modern decor. The largest table area was directly in front of me and my dining companions as we walked in. Off to our right was a lengthy bar, lined with stools for guests to enjoy a Bloody Mary or Mimosa. Beyond the bar, at the bar of the rectangular shaped room was the kitchen. I really liked the fact that you could see straight into it. Your food wasn't a mystery, like it seems to be many other places. A refreshing amount of light flowed through the floor to ceiling windows and properly lit the entire dining room. The first thing I noticed, though, was the shade of wood used not only for the flooring, but also the chairs, and wooden table elements. It was all honey colored. Strikingly similar to, well, Nougatine. Brunch is served on Sundays until 3pm, so I think by the time we had arrived, most of the crowd had left for the afternoon. However, there was about six or seven tables of people still enjoying their meals. Just as we were seated at a window table for four, our waiter, Jeff, was kind enough to place our menus in our hands for the feast to begin.

First and foremost, the entire staff at Nougatine is top notch. Attentive, welcoming, and definitely eager to meet customers needs. Not to say that quality is a rarity in upscale establishments, but more often that not, the staff is discouraged from interacting with clientele beyond "yes sir, no ma'am." Everyone that waited on us was courteous and more than happy to answer questions we had. As we browsed the brunch menu, Jeff was quick to point out that there was plenty of other options that were not listed on the menu. Its by this piece of information alone that we were able to get particular items added to our meal. Personally, I believe that brunch is the best meal of any day. In fact, I've think that 'breakfast' and 'lunch' should be eliminated all together and restaurants should have brunch every day. We made our meal choices and no more than ten minutes later, our brunch had arrived. There were four of us at the table and two of the party chose a waffle with roasted bananas and the other two of us had omelets. This was the only part of our dining experience that wasn't shared between everyone, so while I cannot speak for the others in at the table, I will say that it was the freshest egg white omelet I have ever had. I could tell from the first bite that they used fresh whites, as opposed to pasteurized boxed egg whites. There is a distinct taste difference between the two and I was even more happy that there was no greasy aftertaste in my mouth or residue on the plate. It was served with mesclun greens topped with a sweet vinaigrette dressing and a circle of roasted, thinly sliced, potato medallions
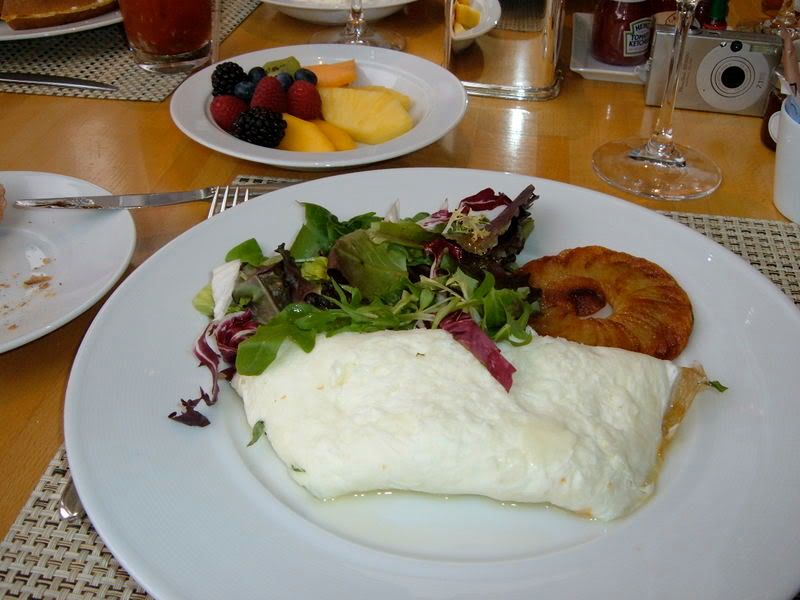

I also enjoyed a side of fresh fruit with the biggest blackberries I had seen over the past 6 months and superbly ripe pineapple, mango, and cantaloupe.
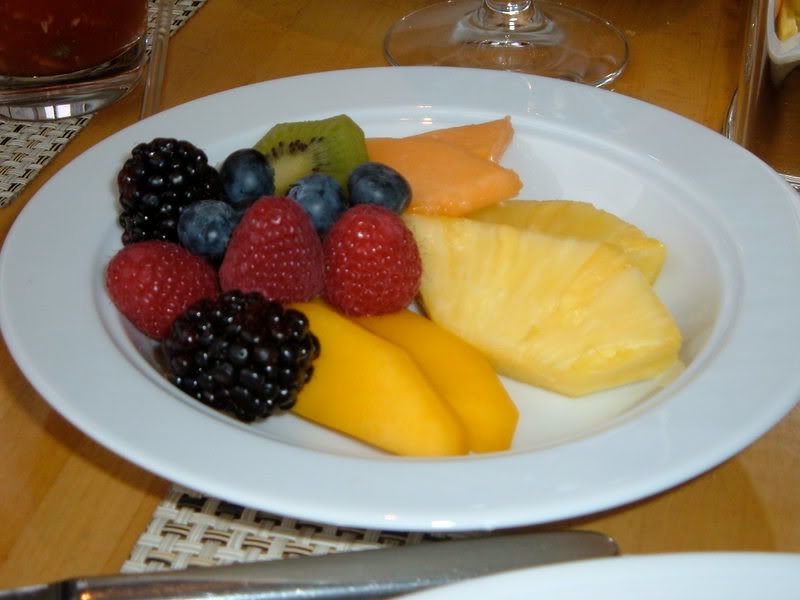

We didn't think our experience could be any better, until we realized why we were all around the table at Nougatine in the first place: DESSERT.

The dessert menu at Nougatine consists of six dessert choices, a selection of ice creams and sorbets, and a chef's selection of four cheeses. The ideas for the individual desserts are the handiwork of Jean-Georges and Nougatine executive Pastry Chef Johnny Iuzzini. Iuzzini, a 2006 James Beard Award winner and one of Forbes.com's 'Most Influential Chef's' of 2007, is an chef who is as plainly talented as he is innovative. We were able to reap the benefits from some of his work in molecular gastronomy as we ate our way through all of the six individual dessert choices. Now I'm sure you're thinking, 'six desserts?! But there was only four of you at the table!' You would be correct, too. In fact, we only ordered four of the six, but one of my fellow diners is also an exceptional pastry extern for Jean-Georges and Iuzzini. This meant we got all six desserts even though we only ordered four. Knowing the right people definitely works in your favor sometimes.

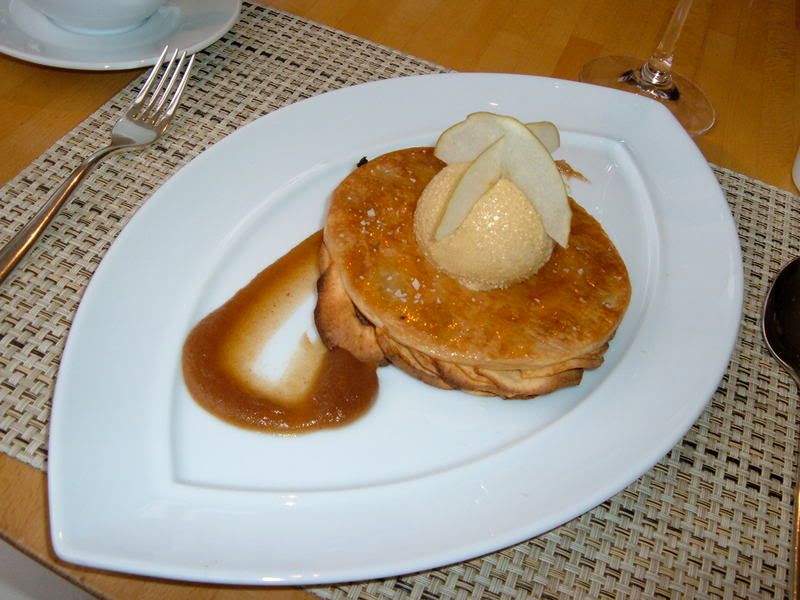
On to the desserts. I originally ordered the Crisp Warm Apple Tart with Honey-Ginger Ice Cream and Date Puree. It was basically an apple tart tatin with puff pastry. The flaky puff pastry itself was perfectly prepared and baked, as were the apples. The particular apple they used was well balanced with sweet and tart flavor. There was a hole cut out of the middle of the puff pastry to serve as an anchor for the Honey-Ginger Ice Cream, which seemed to have actual bits of crystallized ginger in it that melted on your tongue. The ice cream topped tart was placed on a smear of Date Puree, which was spiced and actually almost tasted like cinnamon applesauce. Seeing as the apple is my favorite fruit and food, I was in heaven. The only criticism I had was that it wasn't warm ENOUGH for me. I would have like to have seen a bit of steam coming from the apples themselves.


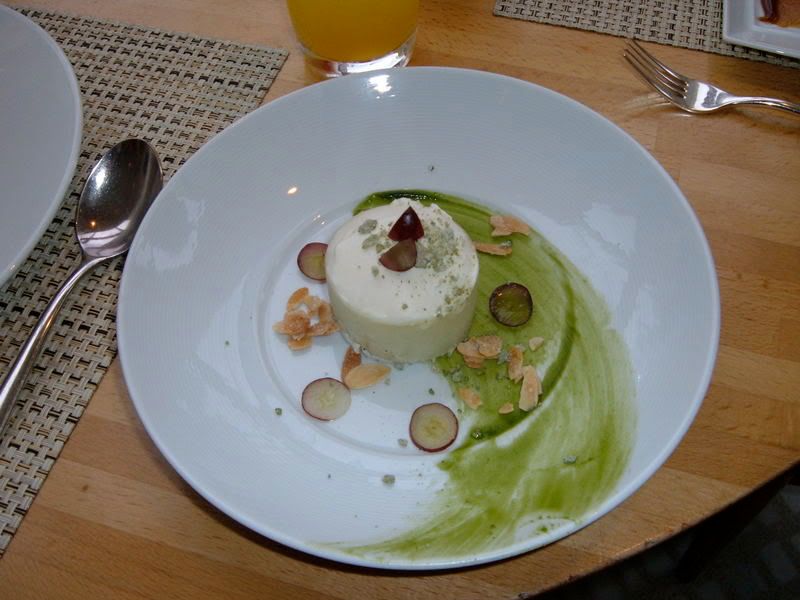
Another dessert we tasted was the Sweet Grape Vacherin with Black Sesame, Shiso, and Toasted Almond Ice Cream. A Vacherin is layers of meringue and cream. In this case, it was a Sweet Grape cream and Black Sesame Meringue. Shiso is a member of the mint family, also known as Chinese basil or Perilla. The Shiso was painted across the white plate and the Vacherin in the center, surrounded with toasted almonds and sweet grape slices. The Almond Ice Cream was on top of the Vacherin, which was so cold that it created a small frozen layer of the ice cream that you had to crack through to get into the heart of the dessert. I was really surprised with its mild taste overall. When I think of grapes I think puckeringly sweet. So to have something this smooth and flavorful that didn't make your face scrunch up while eating it was amazing. The black sesame meringue was sweet and light, and shockingly still crisp! It confirmed my belief that black sesame should be used more often in pastry overall. Vacherin is something I had never eaten before, but I would order it again if it tasted like that.


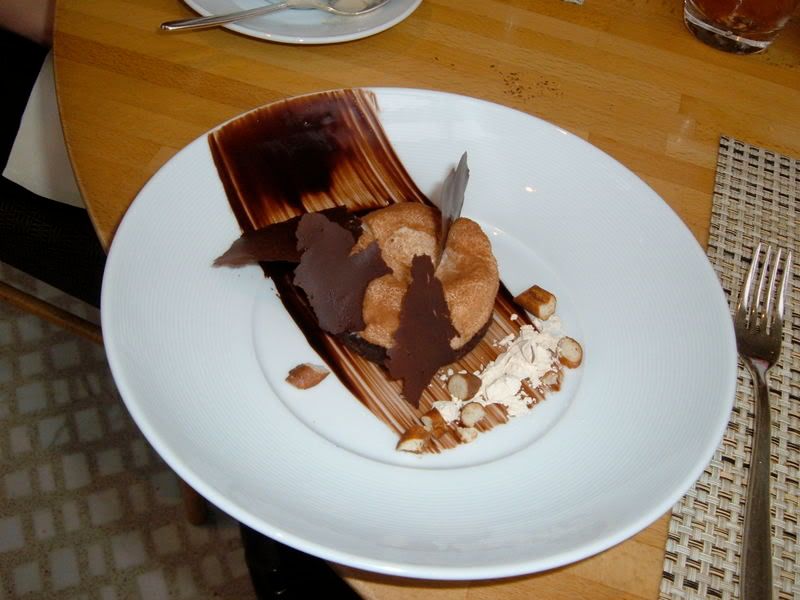
Next up was the Dark Chocolate Brownie (or 'best brownie ever' as they call it in the JG pastry kitchen) with Frozen Stout, Salted Pretzels, and Chocolate Paper. Dark chocolate was swept across the plate using the same paintbrush technique used in the Vacherin. The thinly sliced (and that's all you needed) round of Brownie was placed in the center of the plate and the Frozen Stout looked like a beer souffle on top of it. Bits of Salted Pretzel (made in-house), beer powder, and the Chocolate Paper finished off the plating. The Brownie was decadent and chewy, as it should be, and the Chocolate Paper was literally paper thin. It is made by THINLY spreading out chocolate pastry cream and putting it in a food dehydrator. It was delicate and delicious. My favorite thing, though, was the Frozen Stout. I was pleased to get a smooth beer flavor that wasn't overwhelming by any means. I was concerned that it might be too strong for my taste, but it really wasn't. I think using a darker brew really made a difference. It made me think of a bar serving chocolate covered pretzels as opposed to the normal peanuts and pretzels during happy hour and I kind of wanted a chocolate stick to dip into the Beer Powder, too.


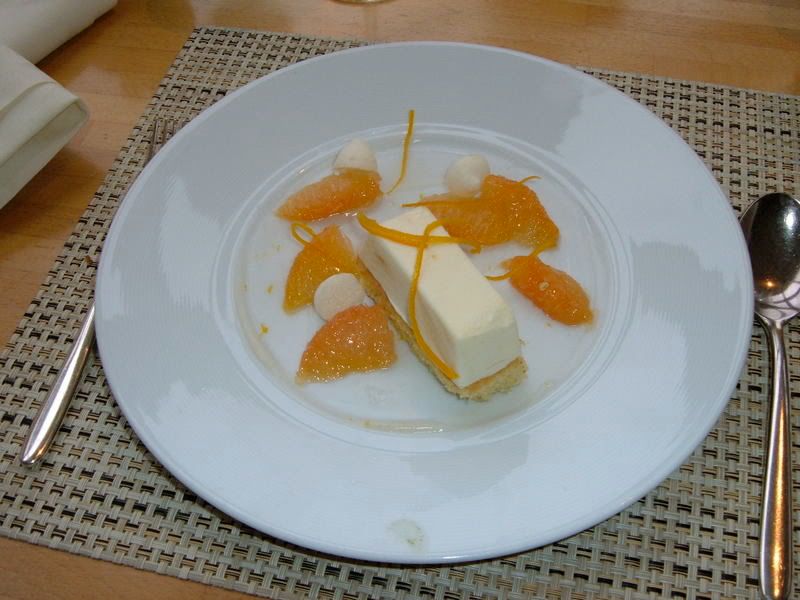
Beth, one of my table-mates, ordered the Citrus Semi Freddo with Margarita Gel, Almond Sponge, and Dehydrated Grapefruit. Semi Freddo means 'half cold' in Italian and refers to a partially chilled or frozen dessert like cake, custard, creams, or fruit. In this dessert, it was a citrus flavored custard that rested upon a cool slice of Almond sponge cake. It floated in a bright-tasting Margarita gel, which enhanced the flavor of the grapefruit which looked fresh because it soaked up moisture from the gel. With many citrus desserts, you have to watch and make sure that it doesn't come out tasting like lemon household cleaner smells. This semi freddo was well balanced and light, perfectly complimenting the moist sponge cake beneath it. They were gracious enough to toss some citrus confit on the top to complete the dish. Excellent use of seasonal ingredients.


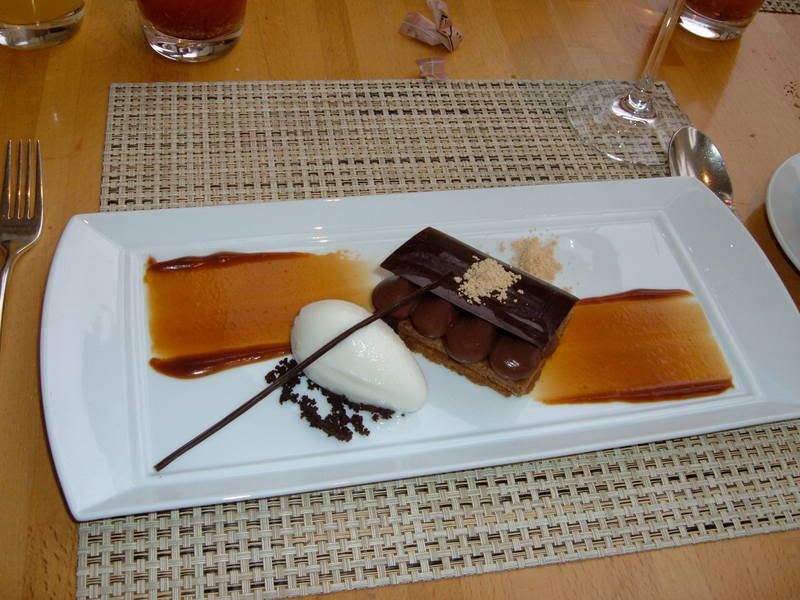
The Bitter Chocolate Cream was served with a Crispy Praline Crunch, homemade Graham Crackers, and Milk Sherbet. It looked like an upscale S'more with 'kisses' of the cream on top of the Praline Crunch and Graham. A thin layer of Dark Chocolate was topping the Cream kisses, caramel mou was painted in strips on either side of the main attraction, and the canele of MIlk Sherbet was served in on chocolate crumble with a chocolate cigarette across the top. The cream was a velvety cross between a custard and pudding. Not too rich and just bitter enough to please the milk and white chocolate lovers too. The graham was crisp and buttery and the Praline Crunch tasted like the inside of a Butterfinger bar. Tasting the Milk Sherbet reminded me of the Ice Milk bars my father would buy for us when I was really young. Insanely good and just like everything else so far, the flavors were all really well matched and balanced throughout the whole dish.


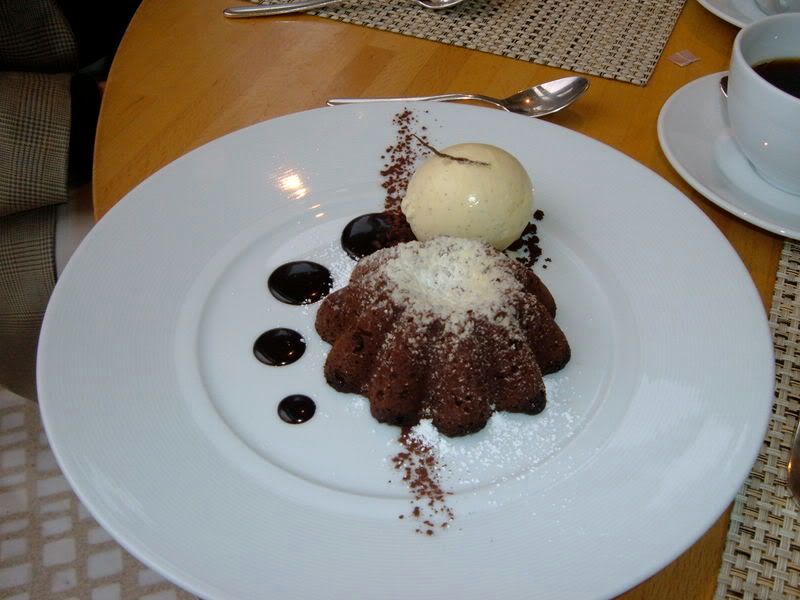
I ended the dessert roundtrip with simplicity. Jean-Georges' Warm Chocolate Cake with Vanilla Bean Ice Cream, a standard at most, if not all, of JG's seventeen plus restaurants. This wasn't a flourless cake, but it had a slightly molten center and was baked in a traditional brioche tete mold. Dots of chocolate sauce lined 12 o'clock to 6 o'clock on the plate and a liberal dusting of powdered sugar really made the deep color of the cake pop. I will be the first to say I am not a huge chocolate cake fan. I will opt for spice cake, vanilla cake, or pie most of the time. But I would order this cake again. It was the correct amount of warmth I was looking for, both in temperature and soul-warming quality. The density wasn't light and airy, but it wasn't as heavy as the Dark Chocolate Brownie from earlier. I can definitely see why this has been on the dessert menu's at JG's establishments for so long.


At Nougatine at Jean-Georges each dessert made sense. The plating was gorgeous and the items themselves, for the most part, tasted as I expected them too. Some of them even surprised me with how good they really were. At a restaurant that has a great menu, Nougatine's desserts complete and compliment whatever you may choose for a main course well. They obviously make a point to work with seasonal ingredients and are pushing the normal limits on creativity with technology. At $9 per dessert, the prices were really fair for Manhattan and you got a great amount of food for that price. The really great thing about the flavors was that nothing was TOO heavy. One could easily finish an entire portion after a full meal and not feel sugar sickness afterwards. Iuzzini is really in touch with creating a selection of items and tastes that appeal to the pickiest of eaters. The Nougatine staff went above and beyond for us and for the rest of the diners as well. Would I go back to Nougatine for dessert? All signs point to yes.
Monday, December 17, 2007

Starting Jan. 5th

A Voce
this is where Ms Jones will be spending her Saturday nights. I may need a couple more chefs coats kids....

Saturday, December 1, 2007

Happy Sweet Potato accident

At school, we're in the middle of the second part of the Viennoiserie (bread) unit. Making everything from challah to oat bread with blueberries and walnuts, to stollen, pannetone, and fruitcake, cornbread and croissants of every kind. We've even gotten into one of my favorite breads of all time: brioche. The eggy, sweet, teensy rolls that are good with sweet or savory filling. This week was the class I had been waiting for since I first saw the syllabus for the whole first unit of class: Sweet Potato Brioche.

Those of you who have talked to me both during the fall and during the spring/summer grilling season know my LOVE LOVE LOOOOOVE of sweet potatoes. When I saw that we could make one of my favorite breads with one of my favorite root vegetables, I was 100% sold. Soooo it figures that this is the day we throw something off.

Thursday we were making a few different things. One of them was Pain Ordinaire (regular bread dough). This dough is a direct mix, which means that everything is combined at once and mixed, then set aside to ferment and double. Normally doughs are made in stages (12 to be exact) which include adding the yeast and salt after an autolyse process, then proofed a couple times before being cut and pre-shaped, bench rested, shaped and final proofed. Not the case with Pain Ordinaire. We had made that dough and then put it in the proof box to double in size.

It was also the same color and size (but not texture) as the sponge we had put together for the base to our Sweet Potato Brioche. THe sponge is used to pre-ferment the yeast and cut down on how long the dough has to be allowed to rest before we can work up the rest of the gluten structure. When we went to put together the rest of the sweet potato brioche, i stepped away to wash dishes or something and there was what was supposed to be the ST sponge. Not thinking clearly, I did question whether or not to add it to the rest of the mixture in the Hobart. I think I even said 'I'm nervous about adding this in...' But in the end, i threw it in and finished the rest of the brioche dough and worked it to a great consistency and smell.

It wasn't until I went over to the proof box and found a bowl labeled 'ST Brioche Dough' with our names on it did I realize I should have trusted my intuition. We still had a sweet potato sponge, and now, a brioche that had a ton more yeast in it than usual, etc. However, we would have to wait until next class to find out.

Once we had our pre-shaped 'brioches' egg washed, we noticed that the only difference between our dough and everyone elses was the color. Ours was a slightly less orange-y hue. We popped them into the oven and hoped for the best. What we got was a surprisingly great result! Sweet Potato dinner rolls. AND because of the decreased (overall) amount of sugar, we think that it made the flavors we seasoned the sweet potatoes with really pop out.

All in all, not a bad result to a potential disaster. I was lucky enough to get some of the rolls (real ones) and they live in my freezer.

i'm a updating machine....

Sunday, November 18, 2007

Dessert Overload

Now how can you read that and expect to find out about something bad? It HAS to be scandalously good. So most of you should be able to realize by now that Ms Jones has been so busy in the kitchen(s) that she hasn't had time to even finish updating you on all that's going on! For example, the last FCI class recap was from Day 10? Yeah, we just had day 46. I am way behind on that. However, there's some exciting things that have gone on here in the past few weeks that I couldn't allow the fatigue deter me from telling you at least a little bit about.

The 10th and 11th of November, I was fortunate enough to be a part of the NYC Chocolate Show 2007. It was the 10th anniversary of the show and everything was taking place at the Metropolitan Pavillion & Altman Building on West 18th between 6th and 7th Ave's. Laissez-vous aller a votre passion chocolat! Basically 40,000 sqaure feet of indulgence for the who's who of the chocolate world and the people who worship it. On Saturday the 10th, myself and a couple others from the FCI went over to have a look around before we all worked the show later in the weekend. Booth after booth of free samples, chocolate for sale, and the actual chocolatiers themselves! Seeing people like Fritz Knipschildt from Knipschildt Chocolatier, Lee Zalban from Peanut Butter & Co, Ilene Shane from SweetBliss, Jeff Shepherd from Lillie Belle Farms, and Jacques Torres himself behind their stations interacting with the consumers directly and on such a personal level was amazing. We got in and passed by the City Harvest booth and went over to the first chocolate art display area to see the 7-foot tall chocolate statue made by Chef Kir Rodriguez and others from the FCI. Making our way around, smelling and tasting, we attempted to check our our Dean of Pastry Arts, Jacques Torres, for his demo in the Viking Kitchen, but it was way too crowded for us to even see! I was able to get a couple photos though. Overall it wasn't a big deal because he's so closely tied into our curriculum and our programme that our paths will cross soon enough...Lucky for us the E. Guittard booth with right next to the stage so we took full advantage of trying the darkest of their dark chocolate: Nocturne 91% extra dark. THe only thing darker tasting than that I had all afternoon was the actual Cacao bean I tried over at Romanico's. How could something be bitter and smooth at the same time? Briliant. As the afternoon went on, we made friends with the worker at the ChocoVision technology booth...now I might be considering getting a tabletop tempering machine someday...but our purchasing took place after we went to the Viking Stage again for the Peanut Butter & Company demo at 5pm.

Lee Zalban was making Peanut Butter Buckeyes, something I was all too familiar with, being from Ohio. It was a favorite recipe from the Peanut Butter & Co. cookbook, which I ended up purchasing and having personalized by Lee himself later on in the evening. Lee didn't really want to get too down & dirty, so he stressed that this was a fun project to have your kids help out on. Therefore a 12 year old boy named Henry, who I later found out had been going to the Chocolate Show since he was 6, and who was also volunteering that weekend, was asked to dive right in and mix the dessert components with his bare (and clean) hands.

After the demo, we 1) ate a buckeye and 2) continued our rounds of the show. I purchased two truffles from Oliver Kita: White Peaches & Cream and Espresso; a pumpkin Bistro Bar from Chocolate Moderne, and Eve's Secret Truffes from Romanico's. These things are insanely good and only 38 calories each because there are no preservatives in them at all. 38 cals for a dark chocolate truffle with an actual hazelnut in the middle! After that, we headed to check out the Chocolate Fashion show and the Chocolate Lounge, where I almost didn't get let in because they thought I was too young. Nice. We made one final stop at the PB&Co booth to get our cookbooks purchased and autographed. Those antics laid the groundwork for the next day, when I would be actually be working the show at the Viking stage.

My shift started at 2pm and I got there with enough time to allow me to change into my chefs coat and checks. Almost ran into Keegan Gerhard when I arrived backstage to check in and get started. Right away, the supervisor of the backstage area, Sarah, was going to have a few of the volunteers who had been there for a while show the new arrivals where to wash dishes, etc. I struck up a conversation with Henry (the 12 year old) to tell him what a great help he was during the demo yesterday and as a result, I was put in charge of monitoring him the rest of the afternoon/evening. Derrick Tu Tan Pho from Barry Callebaut was finishing up his second demo of 'Cappuccino Ebony' of the day. We tidied up after he was finished and got prepped for the next demo, which was from Quady with CocoaVino. They prepared a dessert called 'Drunken Figs' as a part of their demo on Explorations in Dessert Wines: Figs & Chocolate. As volunteers, we were there for set-up, sample distribution, and clean-up for each demo that took place during the amount of time we were there. As Henry's 'keeper' I was also asked to make sure recipes for the demos got properly distributed as well as a couple other things that needed to be passed out to the audience. For the Quady demo, we passed out a sample of the wine that the figs were cooked in, the cooked figs which had been cooled and lightly coated in chocolate, then a white dessert wine to compliment the figs. As we cleaned up after that, the next demo, which was essentially a lecture by DeAnna Radaj, took place. As people learned about Chocolate and Feng Shui, Matt Gennuoso from Chez Pascal in Providence, RI showed up for his demonstration at 5. Henry had gone off to walk around the show, which left me free to assist Chef Gennuoso with his prep for Spicy Black Bean Chocolate Soup and Pork stuffed Piquillo Peppers (a small roasted red pepper from Peru). What I was basically doing was putting a bit of a mixture of fennel and onion (cooked in a duck broth) and then placing one of the Pork (and chocolate) sausage stuffed piquillos on the top of that. They had been cooked prior to coming to the show to save time and we were reheating them before plating them. It saved even more time to reheat them exactly how they were going to come out on the plate. I think I prepped about 150 veg & pepper combos. Once that was finished, my 'partner' Henry and I were set to reheat the Spicy Black Bean Chocolate soup (made with mole). We headed up the stage range with our soup filled stockpot and talked with Chef Gennuoso while we waited for 5 o'clock to roll around. Once the clock reached time, I darted behind the side curtains while Henry helped out Matt and at a certain time during the demo, it was my responsibility to grab the 3 trays full of peppers and veg out of the ovens behind the main range so they could get plated and served hot to the audience members. A teeny cup of the chocolate black bean soup was served on the side of the pepper (on the same plate) with a small dollop of creme fraiche. In the end, all the soup/peppers went out looking and smelling great. From what I heard, it tasted out of this world too.

Clean up ensued while the team from Donatella & DavidBurke finished putting together their individual desserts of Chocolate Domes for Parties & Such. They had two different versions: one dome was covered in cocoa powder and had a slight coffee flavor to it. The center of the dome was a vanilla custard. The other was covered in toasted coconut and the center was fresh grapefruit! Really bright and fresh tasting! It went really well with the cheesecake lollipops they served alongside the dome, which was additionally topped with a chocolate lace pistole. Each cheesecake lollipop was nestled in a rosette of bubblegum, yes, bubblegum, whipped cream. The first thing I thought when I tried it was straight Bubble Yum. However, the gum flavor melted away and you were left with a gorgeous whipped cream taste in your mouth. Gustavo Tzoc really knows what he's doing in creating such a subtle flavor.

The rest of the night was spent cleaning and consolidating kitchen equipment. The actual kitchen set itself had to be disassembled double quick because the people from Viking were coming to physically take it away! All the cabinets, shelves, and fridge compartments were emptied onto tech tables so the Viking guys could swoop in for the takedown. We separated the Kitchen Aid products from the Oxo-ware...the full sheet pans from the half sheets...the spatulas from the whisks, etc. After each piece was cleaned off, they were grouped together either in their original boxes or in rubbermaid totes, then labeled for later identification. Once everything was labeled, organized, and stacked for placement on the trucks, it was time to say goodnight. We were lucky enough to get a few things from the chocolate vendors (ahem, boxes of 72% Valrhona bars...and Oxo cooking utensils) and an immeasurable experience. Where else could we eat our way through exhibits one day and then get to work with world class chefs the next? Everyone I came in contact with was amazing. Sarah, the Viking kitchen supervisor was so professional and down to earth. I thanked her 1,000 times over. At this point, I'm just dipping my foot into the baking and pastry arts world...I can't wait to dive headfirst.


Coming soon...encounters with duff, hot pink Evian leotards, dancing men, and Ron Ben!

Sunday, September 23, 2007

FCI Week Three

The FCI Pastry 1 - Week 3

Tuesday 08/28

DAY 7 - Today started off on a rather high note. The ladies of TTS Pastry I adore Chef Guido. He's funny, charismatic, Italian, and his biceps look like someone shoved a tennis ball into them. Up to this point, he's been the only Chef-Instructor we've had for all this Serv-Safe information. On this particular Tuesday though, we had Chef Tim. Apparently Chef Tim is the normal instructor for all the sanitation stuff, but since we're at an awkward time during the week, Chef Guido had been taking his place. I think all of the class (maybe minus Karim) just stopped when Chef walked into the room. In speaking with a couple of the other women after class and beyond that day, Chef Tim's got what is referred to as the 'Mens Health' look. Taller, in great shape, salt & pepper hair...think Bruce Willis or Cal Ripken Jr. That's all I'm going to say about it though because this is a COOKING BASED BLOG after all. But there was a good amount of giggling from grown women. Sort of like those old Diet Coke commercials where the ladies are watching the construction worker through the window...teehee.

We finished all the lecture on sanitation and did a mini-review/practice test because the actual exam was going to be on Thursday. With that out of the way, we could get started on the itinerary for the rest of the afternoon/evening. Just two main projects to work on: Tarte l'Oignon and Fig Newtons.

We thinly sliced (and I onl cried for a little bit) two large onions each to prep the filling for the Tarte l'Oignon. They were placed in a large saute pan over LOW heat with a small amount of butter to start the cooking and caramelization process. Its important to use low heat because you don't want the butter or the onions to burn at all. Slow and low makes the results perfect in the end. The onions took a good amount of time to caramelize, but they turned a beautiful golden brown color. Once they were finished, they were turned out to cool on plastic wrap for later use.

Both our Fig Newton filling and dough were already prepared from last class. Remember we had softened the figs by simmering them in a sugar, water, and lemon juice mixture? Of course you remember! Our dough split between table-mates then rolled out to about 6x24 inches or the length and most of the width of a half sheet of parchment paper. We prepped a basic egg wash (1 egg, 1 egg yolk, and a pinch of salt) and brushed the border of the dough (about an inch and a half in) with it. Half of the the fig filling was placed down the center of each dough sheet in a straight line and then the edges of the dough were folded up around it. Sort of like making a long sweet fig burrito. The egg wash acted like a glue to keep the dough together. The roll was coated with the egg wash and then put back into the refrigerator to chill for another 20-30 minutes. This step is important because if we baked these right away, the dough would melt and expose the fig filling.

While the onions were still cooling and the figs were chilling, each person had a bit of time to make a batch of Pate Sucree for next class. We are really getting quick at these doughs and super quick at tidying up our stations after each section on the daily outline. With our sucrees divided into two, wrapped, labeled, and in the fridge, it was time to assemble Tarte l'Oignon.

We grabbed our chilled galette-style doughs we rolled and decoratively hand edged last class. The cooled caramelized onions were placed in a even layer on top of the chilled round. We sliced roma tomatoes into medium medallions and those went over the onions. Next was a layer of chopped walnuts, followed by a sprinkling of bleu cheese. Any other tangy soft cheese could be used instead, but the bleu really compliments the other components exceptionally well and it melts nicely in the oven. The tart was seasoned with salt and pepper (or in my case, just pepper) and put into a 350 degree oven where it would stay for about 10-15 minutes or until the galette crust was browned and baked all the way through.


The final task for the day was baking off the Fig Newtons. We held off on putting them in the oven with the Tarte l'Oignon so there would be no possibility of scents/flavors mixing and invading each other. You don't want your sweet figs tasting like sweet onions, right? Oven temp for the logs was also 350 and they only took about 10-15 minutes as well. Since the figs were already cooked, the main thing you want to look for in these is a nice brown crust on the dough. When they were finished, they were sliced, while still warm, on a diagonal into equal parts. The dough on these cookies is so crumbly that if you were to wait to slice them, you really run the risk of ruining the look of the finished product. That being said, it is probably the best tasting dough I think we've made so far. Extremely tender and perfectly sweetened. Figs are a unique taste all on their own, so their flavor just went hand in hand with the simple crust.


--------------------------------------------------------------------------------------------------------------------------------------------------------------------------------------------------------------

Thursday 08/30

DAY 8 - The first item on the outline for the afternoon was supposed to be the big Serv-Safe sanitation exam. A wrench was temporarily thrown in that plan because a Chef-Instructor to actually administer the teste to us was nowhere to be found. Good thing though, because it gave everyone a chance to roll out the sucree dough that we had made on Tuesday. One portion of the dough was rolled into 4 tartelette shells and the other half of it was rolled out into one large tart ring. Chef Guido was finally tracked down by the time everyone had their dough rolled and put back into the fridge to relax the glutens before use.

The Serv-Safe exam was 90 questions, but supposedly 20 of them don't count. You can miss some and others are test questions to gauge what students are really learning from the course book and lecture sessions. There's really so much minute detailed information in the lesson plans that many of the questions are really common sense. I only had to go back and re-assess my answer on two questions. We all kind of gathered in the lounge after finishing until all the tests had been turned in. There MAY have been more giggling about Chef Tim...MAYBE.

Once we had all regrouped and decided the test was ten times easier than we thought it would be, it was time to get down to business. We had to turn our attention to Spritzkakor or Scandinavian Butter Cookies. This was going to be our first attempt at piped cookies, meaning the dough is actually placed via piping bag and a star tip to be baked. Often you'll see these types of butter cookies with a maraschino cherry, nut, or preserves in the middle of them. The one that was in our original curriculum called for butter, powdered sugar, salt, lemon zest, eggs, vanilla extract, Chef Cynthia didn't particularly care for that recipe, so we got another one that used almond paste, granulated sugar, butter, egg, egg white, and a considerably smaller amount of cake flour. Other optional ingredients include a pinch of sat, vanilla extract, and lemon zest. The almond paste and sugar are creamed to a very soft consistency, otherwise the dough would be too stiff to pipe. A bit of the egg can be added to aid in the creaming process if necessary...to ensure total smoothness. The butter was creamed in next, followed by the egg and egg white. After all those ingredients were well combined, the optional salt, vanilla, and lemon zest could be added. And the flour was mixed in last just to combine. With a piping bag and a simple twist of the wrist to make a double rosette on the baking sheet out cookies were placed and then we pressed a tiny well in the center of each one. I know personally, I had to try a few times to get the paper coronet rolled just right to squirt raspberry preserves into the dent, but once the rolling and folding had been mastered, the coronet had been filled, it took no time at all. They went into the oven at 350 until they looked like this:


When the Spritzkakors were in the oven we prepped the tart and tartlette shells for cuire a blanc. The large shell would go for the Claufoutis later on in the evening and the minis would be used during next class for Tartelettes Aux Citrons.

Claufoutis (Klau-Foo-Tea)Aux Cerises Limousin was point five on the itinerary, so we all mis en place'd for that. When our pre-baked shell was finishing cooling, we made a simple custard using milk, heavy cream, vanilla, eggs and sugar. Traditionally, Claufoutis was made with un-pitted black cherries, but this evening, we had blueberries to use. Claufoutis can also be made with flour to create more of a batter filling that is poured into a baking dish over fruit. Chef Kir Rodriguez had a recipe like this that Chef Cynthia made last class and it turns out to be a more cake like consistency. Scratch that, like a round blueberry muffin. That's what it reminded me of. The version we did just had us place the fruit in the bottom of the tart shell, then pour the custard slowly over it until it was filled. It went into the oven at 250 degrees for about 25-35 minutes until the custard was set around the fruit. The thing I noticed about this tart was that the custard didn't pull away from the fruit it was baked around like it did in the Tarte Alsacienne. I'm not really sure why, but it behaved itself more. Perhaps it was because the apples in the Tarte Alsacienne had other ingredients on them which prevented the baked custard to completely adhere to their sides. At any rate, once the custard was set, this is what our Claufoutis looked like:


Lemon Curd was the final task for this Thursday afternoon. We just had to make it and wrap/chill it for use on Saturday. Sugar, lemon zest, lemon juice, eggs, and butter are all placed in a bowl over a bain marie. We also had a couple sheets of gelatin (for thickening) that were soaking in cold water. That mix is cooked over medium heat until it reaches a hollandaise consistency. The gelatin is added off heat at that time then once the sheets have completely dissolved, the curd is strained. This catches any bits of lemon zest or curdled egg that might have remained in the curd. Its then placed and wrapped on a plastic lined sheet pan. When we all had our curds sealed and ready to chill, we could clean up and call it a night. I think it was a nice easy way to end the evening by making something that wasn't that messy.

Haha, I just wish it meant that I wasn't the last one in the classroom again...every night! My OCD gets the best of me. Thankfully its the kitchen cleanliness that really reaps the benefits...However, it also makes me feel like I am not working fast enough. I completely get that school is all about the learning process. Learning to do things well in an efficient manner to meet the time demands of the culinary industry. But for some reason being the last one out of the classroom gives me this overwhelming sense of incompetence. Hopefully that will pass in good time.

Now might be a great time to mention the blogs of two of my companions on this FCI Baking and Pastry Arts journey. Nancy's blog can be found here: http://www.nancy-loves-sweets.blogspot.com/ and Tara's is over here: http://pastryfluff.blogspot.com/. They are filled with amazing photos and useful information. Definitely check both of their sites out and wish them the best of luck on this adventure! I am so glad to have such wonderful people to share this time with.

--------------------------------------------------------------------------------------------------------------------------------------------------------------------------------------------------------------

Saturday 09/01

DAY 9 - This Saturday's class started off with a good rolling of Pate Sucree that we had made ahead of time. It was to become the base for one of the projects, the Tarte Aux Noix, that was to be completed later on in the morning/afternoon. Nothing like the sound of wooden rolling pins banging on metal tables to 1) soften cold dough and 2) wake you up in the morning.

When that round was rolled, fitted, and back in the fridge chilling to relax the glutens, it was time to prepare the Creme d'Amandes we would need as part of the filling for the Tarte Aux Noix. The first Creme d'Amandes we made was almond cream with almond paste. We used butter, almond paste, eggs, and pastry cream powder. This Creme d'Amandes we were going to use for the Tarte Aux Noix was more traditional, using butter, sugar, almond flour, eggs, and pastry cream powder. Basically we were making our own almond paste for the cream instead of using pre-made paste. Judging from the smell and texture of this traditional Creme d'Amandes, it was well worth the maybe 30 seconds of extra labor it took to get these different ingredients together. With that set aside to use later on, we could move on to Confit de Citron.

It may sound fancy, but Confit de Citron is really just candied citrus peel. It could be orange peel, lemon peel, grapefruit peel, the process is the same regardless of what citrus you're using. You can cut the PITHLESS citrus peel any style you like (we julienned) then place it in a saucepan completely covered with cold water. Bring that mixture to a boil and then strain. This process, called blanching, is repeated three more times before bringing the peel to a SIMMER in a saucepan with granulated sugar and corn syrup. The simmering only lasts as long as it takes to get the peel translucent and tender. The (in our case lemon) peel was dried on a cooling rack until it is tacky-like in feel and then you can roll it in powdered sugar or use it unpowdered. It will keep a GOOD LONG WHILE when refrigerated, as long as you store it in its cooking syrup.

Next up was a short lecture on meringues. Because we were using a meringue for the finish on our tartelettes aux citrons, it was imperative that we learn what kind of meringues there are and how each one is properly prepared and used. Meringues are a mixture of egg white foam and sugar. What differentiates the types boils down to the consistency of the sugar, when its added, and temperatures. There are three types of meringue: French, Italian, and Swiss. French meringue is the most delicate kind of meringue: raw sugar is beaten into egg whites. Its mainly used in cake and cookie preparations because it MUST be baked. This is due to the potential of salmonella to exist in the raw egg whites. The egg whites are foamed in a mixer until frothy and then the sugar is added little by little at medium speed when the whites are at soft peak stage. Its continued to be beaten at medium speed until just before it done, a process called searing, which prevents the meringue from deflating immediately once the whipping action has stopped. For an Italian meringue, wet sugar is cooked to softball stage (around 238 degrees farenheit) and then is beaten into egg white foam. The whites of the egg poach the sugar, which provides for a good amount of volume, but also good stability in the overall mix. Italian meringues are used for the bases of many mousses and buttercream fillings. Since the egg whites are heated by the hot sugar syrup, there is no need to bake the meringue after its made. The egg whites and sugar in a Swiss meringue are heated and foamed over a bain marie to about 130 degrees farenheit. Once that temperature is reached, they are finished whipping in the stand mixer. This technique results in less volume and lightness to the meringue, but its definitely more stable than the French would be. Swiss meringues are often used for baked meringue decorations and it was the Swiss meringue that we used to finish our tartelettes with later on that afternoon.

We had a French Nut Tart to deal with first though. We had already rolled pate sucree shells for this Tarte aux Noix. A thin layer of raspberry jam was spread in to the bottom of the unbaked and undocked tart. Toasted, sliced almonds were sprinkled on top of the jam and then we put the shell back into the fridge while we prepared the rest of the filling. The creme d'amandes we made earlier was paddled until it was smooth. Egg whites and sugar were then whipped to still peak for a French meringue. The meringue was folded into the creme d'amandes along with hazelnut and almond flour to make a batter. This heavenly smelling batter went on top of the jam/almond layer of the tart shell and the whole thing went into the 350 degree oven for about 20-30 minutes.

Each person in the class made a full recipe of pate brisee for next class and then it was time to move into the tartelettes aux citrons. Using the lemon curd that we made in the previous class and our prebaked tartelette shells, we spread a bit of the curd to fill each shell. They were set aside in order for each team to make their first official attempt at Swiss meringue. Not too shabby for novices! Our meringues were then piped onto the tartlettes in our choice of decorative patterns. From there, we each got our hands on a communal blowtorch to brown the tops of each meringue, taking extra care not to burn them. Some of the confit de citron that was draining on racks from earlier was used to finish the decor. At this point in the process I could tell you how good they looked...or I could show you:


By this time our Tarte Aux Noix were out of the oven and waiting to be finished on the cooling racks. The tops of these tarts are traditionally finished with powdered sugar in a pattern. Many of the class did snowflake-esque designs or hearts. I on the other hand, HAD to put my spin on it. So Week 3 at the FCI for Ms Jones ended with a crossbones pattern of my own:


Next week: Chocolate, caramel, chocolate, caramel, a smidge more chocolate, a teeensy bit more caramel, Linzers, and a sprinkling of cheese...

Tuesday, September 4, 2007

FCI Week Two

The FCI Pastry 1 - Week 2

Tuesday 08/21

Despite the consistent downpour that was happening in NYC this Tuesday, I managed to get to school only slightly dampened as opposed to completely soaked. Storing my umbrella and rain boots securely, I got dressed and headed into the Pastry I Kitchen.

Day 4 of the Classic Pastry Arts program was probably the most jam packed so far. Each day is outlined on the front board and the one for 8/21 had TEN main tasks to accomplish in 5 hours. We started in with the Gingersnap cookie dough that we had made in class on day 3. The dough was cut into 20g pieces. Once those were in their 350 degree home, it was time for clean up and pressing onto the next task. (Each person made up their own individual tray with rows of 3 and 4 cookies...totaling 28 cookies per sheet, therefore 28 cookies per person. Each team did end up having extra dough, which we could take home to finish baking, etc.) Each 20g piece was rolled to lighten the consistency and ultimately the color of the dough itself. Once rolled, each ball of dough was then coated in granulated sugar and placed on a parchment lined baking sheet to go into the oven. They were staggered to allow proper air flow through the pan, therefore giving even spreading during the baking process.

Oh SNAP its the SNAPS!:


Clean up followed, then it was onto the Creme d'Amandes (almond cream with almond paste). Almond paste is essentially 50% almond and 50% sugar. It is also used to make marzipan. The almond paste is creamed together with butter (the process is called 'Blanchir' or to make white), then eggs are incorporated. Next, the pastry cream powder dives into the mix and you also have the option of adding rum or other alcohol for flavoring. Once everything is combined, the Creme d'Amandes must be refrigerated. It was super simple to make and smelled incredible!

**There are substitutions for the pastry cream powder if none is readily available to you. Try flour or cornstarch, but the amount you add should be increased (from the amount of pastry cream powder in the original recipe) by one-third.

With Creme d'Amandes in the fridges, it was time to move on to poaching the pears for our Tarte Bourdaloue. First task was to quarter the recipe used in the coursebook. Because each team was making their own seasoned/poached pears, there was no reason to make such a giant amount of Liquide de Cuisson. This poaching liquid was equal parts water and white wine, sugar, vanilla bean, and lemon juice. We were also allowed to make our own seasoning for the pears out of a myriad of spice choices. My tablemate trusted my judgement to create the mix, so I returned with a blend of cinnamon stick, ainse, fennel, pink peppercorns, cloves, and juniper berries. Pears themselves are a mild fruit that takes on what its cooked with quite well, so I thought that the combination would be amazing. Once all the ingredients of the Liquide de Cuisson were brought to a boil, the pears were added cut side down and the heat was reduced to a simmer. The ideal temperature for a poaching liquid is around 180 degrees farenheit, or just before boiling. This is because you want to cook the pears slowly and allow them to really absorb all the flavors from the spices you've added. The pears were turned cut side up after a few minutes in the 'hot tub' because we really wanted the sides that would face up on the tart for presentation to be spot on. They turn a lovely speckled fall shade of beige and brown. Testing for doneness involved a paring knife inserted into the middle of the fruit and very little resistance occurs. When the pears are cooked, they are set on a cooling/drying rack to settle before they are used for the Tarte Bourdaloue topping.

Pears are cooling and we are moving on to baking our pre-rolled Brisee shells for Tarte aux Fruit Fraiches. Some of the Creme d'Amandes that was made not too long ago was going to be used in this as a baked filling. When dealing with tarts or desserts in general that have a fresh fruit topping, this is common practice. The creme browns nicely in the oven and actually resembles cheesecake filling after its baked. The perfect round baked ring in the middle of the tart looked good enough to eat even without the fruit topping on it!

After those got slid into the ovens, it was onto our first baked custard: Pots de Creme au Chocolat. A couple of the processes in this (particularly for the finished product) were some of my favorites for the day. But first, lets talk about what a baked custard really is. Simply put, a custard is a mix of liquid and egg that thickens when heated (due to coagulation of egg proteins) The consistency of a custard is related to the amount of eggs in the mix. For baked custards (one of the three types of custards), the liquid (milk and heavy cream) is scalded before the addition of the eggs. It reduces cooking time overall and helps the custard cook more evenly. The actual baking takes place in a bain marie (or water bath) at a temperature no higher than 300 degrees F. As in any custard, too much heat too fast could have an adverse effect on the finished product. Here a higher temperature increses the chance of curdling. For our Pots de Creme, we melted chocolate into the boiling milk/cream mixture then added it with egg, egg yolk, sugar, and salt. The entire thing was strained through a chinois to eliminate any lumps that might have occured. To save time, we all strained our mixes into communal pots then poured ourselves 2 ramekins per table of pots de creme. Sometimes there might be a foam that develops on the surface, which you never want to bake because it just doesn't look right...that is easily skimmed off the top with a piece of plastic wrap or paper towel. Once the custards are baked, they are immediately removed from their water bath and put somewhere to cool off. If they were left in the bain marie, they would just continue to stew and become over cooked. And lets be honest, no one wants overcooked chocolate custard. Highlights of the day: The use of the ramekins really excited me because I like the idea of individualized desserts. The bain marie is close to my heart because I use that when I'm 'cheesecaking.'

Pots de Creme ready to go and we were cleaned up and getting right into finishing our Tarte Bourdaloue. One thing to keep in mind readers: when you see Bourdaloue, automatically think of pears and almonds. We took more of the creme d'amandes we from earlier and used that as a filling. Our cooled poached pears (5 halves per tart) were then sliced across the core and fanned in a star pattern on top of the creme d'amandes. Any open spaces were filled with raw sliced almonds. By the time the Bourdaloue's were ready to be baked the Pots de Creme were out of both the oven and their water baths. A rosette of Creme Chantilly and chocolate shavings completed the presentation.

My Bourdaloue!

As for the finish for the Tarte aux Fruit Fraiches, we had free range as to how we could decorate with Orange supremes, sliced kiwis, and fresh strawberries. Peeling and slicing fruit can be not only a tedious, meticulous task, but quite a messy one as well. Nothing compares with the job of extracting orange supremes or the de-pithed segment of orange in between membranes. I'm not sure the de-pithed is really a correct term to use...but its my blog, ha. Again, I apologize for the tardiness of the photo postings all. Once another copy of FinePix viewer makes it to my hands, the photos of the deliciousness will be all yours! With the last few minutes of time left in the day, everyone whipped up another batch of Pate Sucree to use next class. We're getting pretty good at the doughs now simply because we've been making them over and over again. The only one we haven't delved into yet is the Pate Sablee ('sandy' dough) which is more of a shortbread than anything else. In then end, both the Bourdaloue and Tarte aux Fruit Fraiches were topped with the Apricot nappage. Yet another night where Ms Jones had her arms and backpack full with things to bring home.

Finished Tarte aux Fruits Fraiches:


_____________________________________________________________________________________________________

Thursday 08/23

DAY 5 - Another HUGE itinerary awaited myself and my fellow Pastry I classmates today. Two large tarts, batches of both Brisee and Creme Patissiere, Vanille Kipferls, and a lecture on conversions.

First up, Pate Brisee. If I haven't mentioned this before, making Brisee is one of the most tedious processes we've encountered in the Pastry I kitchen. However, the end result of Brisee, if done correctly, it worth all the labor that goes into the dough itself. After sablage, frisage, division, wrapping, chilling, and cleanup, everyone whipped out their recipes for Vanille Kipferls (Viennese Vanilla Crescents). These remind me of the crumbly butter cookies covered in powdered sugar that you see running rampant around the holidays. High flour content, ground hazelnuts, and held together by butter and powdered sugar. **You can get ground hazelnuts as hazelnut flour OR just toast, cool, and grind your own in a food processor.** When the dough was mixed, it was left at our stations to sit at room temperature. Since it was to be hand rolled later, we didn't want it TOO cold to handle.

From this point on in the day, it was really about preparing for finishing works in progress. We rolled out the two rounds of Pate Sucree we had made at the tail end of Tuesdays class for 1 large tart ring and 4 tartelette shells (which were to be saved for use next class). We also took one of the chilled mounds of brisee that had been formed first thing that afternoon and gave it the good college try to roll that into a large ring as well. Each brisee shell had to Cuire a Blanche, and that took place after it had been rolled and filled with baking beans.

When they were CAB'ing, we were wrist deep into our second go at Creme Patissiere. Again, the real key to the texture you want out of your pastry creme is the whisk action. If you are not constantly and consistently whisking you'll end up with lumps from coked eggs. After 2 minutes of circling (ie: when your hand/wrist feels like its going to fall off), the creme was left to cool in plastic wrap on a baking sheet. The cuire a blanche was done on the brisee shells and they were cooling as we geared up to assemble the Tarte Alsacienne.

Many of the tarts we had done before had shells that needed to be docked to allow for steam ventilation during crust baking. Not so with the Tarte Alsacienne. The filling for it was quite runny so anything we put it into before baking had to be sealed properly. If it wasn't, then there would have been custard all over the inside of the ovens. It would have smelled great, but clean up would have been horrendous. The filling had two components: caramelized and flambeed apples and a custard out of egg, sugar, milk, heavy cream, and vanilla extract. Apple slices were first browned in butter on the stovetop, then sugar was added and caramelization began. Once they had turned a nice rich brown color, brandy was added to flambe the apples and allow any liquid in the pan to thicken up. Flambe is truly an art. The hand have to move in time with the arms and in harmony with the alcohol and heat source. Definitely not for the faint of heart. The apples were then set aside to cool as the custard was prepared and pushed through a strainer to make sure it was smooth and sleek. We took our pre-baked brisee tart shell and arranged our apple slices in the bottom of it. Once they were places, the fine custard was poured in and filled the inside the rest of the way. It was then put back in the oven an 250 degrees for about 15-20 minutes. With custards, time and temperature are very important. The cook time on this would have been much longer and, consequently, the custard would have been overcooked, if we didn't pre-bake the shell. This wasn't one of my favorite projects but that's just because when the tart cooled, the custard began to pull away from the sides of the appled. This left gaps everywhere and I'm not sure how they could/can be prevented. The finished product is beautiful right away, but I think this is one that should be served immediately simple for aesthetic reasons.

Creative control was give to us once again as we shifted gears to the individual Tarte aux Fruits. This particular shell was docked, then filled with creme patissiere and topped with graham cracker crumbs. Cake crumbs could also be used if you had them readily available. The supply list for the day apricot halves on it, therefore, that's what we used. Each half was split into thirds (after they had been freed from their aluminum jail and thoroughly drained) and placed round side down in a sort of bulls-eye formation on top of the graham crumbs. It was then baked at 350 degrees until the shell was completely baked through.

WIth the Tarte in the oven, Vanille Kipferls kept our hands and minds busy. Balls of dough were hand rolled and shaped into 20g crescents. The hand rolling really aided in the dough softening process, which was much needed because the texture was so crumbly to begin with. Each student made 20 crescents each and they were sent off to the 350 degree oven for about 10-12 minutes. As soon as they came out of the oven, they were rolled in vanilla sugar and left to cool. Its imperative to roll them in the sugar when they are still warm, otherwise whatever you're rolling them in will never stick the way its supposed to.


They came out right after our Tarte aux Fruits were done too! This tarte was particularly difficult to glaze with apricot nappage just because no matter how long you baked it, the graham and the apricots were definitely not securely rooted down. It was the same way with the almonds on the Tarte Bourdaloue. It takes a light touch and an even lighter glaze to do the job right.

Tarte aux Fruits:


Day number 5 was rounded out with a lecture on US-Metric volume, weight, and temperature conversions. AND we received our first real homework assignment. Converting all the US volume/weight measurements in the recipe for Chocolate Heaven Cookies into metric so we could bake them for the next class.

_____________________________________________________________________________________________________

Saturday 08/25

DAY 6 - Shorter itinerary due to more sanitation lecture! But despite the less labor intensive beginning to the class, then rest of it held Chocolate Heaven Cookies, Fig Newtons, a 'galette' brisee dough, and Tartelettes aux Fruits Frais.

This Serv-Safe portion of lecture covered Food Safety Management Systems, active managerial control, the HACCP (Hazard Analysis Critical Control Point) philosophy, standards for water supplies, plumbing, sewage, backup control, cleaning and sanitizing equipment, and Integrated Pest Management. While I'm sure you're all dying to know the 5 steps in Active Managerial Control focusing on controlling the CDC's 5 most common risk factors responsible for foodborne illnesses, and the proper balance of chemicals in 3-compartment sinks...I'll spare you those details. I will tell you that while we were getting our brains filled with rules and regulations, our tartlette shells we rolled out on Thursday were being Cuire a Blanc so that we could fill them later on in the afternoon. Those came out of the ovens, lecture was over, everyone did a quick round of calisthenics (ok, that part is a lie...lol) and it was into Chocolate Heaven Cookies.

Doing the actual US to Metric conversions wasn't difficult at all. One just has to keep in mind that volume is different than weight. All ingredients have different densities and it is important to pay attention to what type of amount is used in each recipe. For example: in VOLUME 1 fluid oz. is equal to 29.57 milliliters. 1 pound is equal to 454 grams. In WEIGHT 1 ounce is equal to 28.37 grams. Yadda yadda yadda. This particular recipe is as close to a flour-less cookie as we're probably going to get here at the FCI. only about 43 g in the whole thing! The main ingredients were three different kinds of chocolate (regular, unsweetened, and chips), sugar, butter (again, a small amount), eggs, and pecans. Also small amounts of coffee and vanilla extract, salt, and baking powder. The regular and unsweetened chocolate as well as the butter were melted over a bain-marie on the stove. That mixture was then folded into the light and fluffy mix of eggs, sugar, extracts, and NaCl. Lastly, the chocolate chips and pecans were folded in. The job of placing these was definitely one of the messiest we've had so far. I honestly thought they were going to spread alot more just because of the runny texture to the main dough, I mean, there's only so much stability added by chocolate chips and nuts. Much to my delight, they barely spread at all and the final product was crisp on the outside and chewy inside. The best part about the cookies is that they weren't overly sweet. The different kinds of chocolate really gave it a more bitter taste and as far as chocolate goes, the more bitter, the better. I would eat all chocolate desserts if they were prepared with 85% Cacao or more. Anyway, all's well that ends well in the land of Chocolate Heaven Cookies.

Two prep processes were then completed for our homemade Fig Newtons. The dough was different than the sucrees and brisees we had been dealing with up to this point. It was its own delectable entity. Pretty basic: butter, sugar, egg, salt, and flour. But there was something different about the texture of it...and paired with the fig filling...I couldn't wait to see how they would turn out! Anyway, the dough was done super quick. Blanchir the butter and sugar, then add in the eggs slowly, mix the flour and salt just to combine. The filling was made in a similar manner to the poached pears in that the base was water and seasonings. This time around, the figs were simmered until tender in a mix of sugar and lemon juice. I had never cooked with figs, dried or fresh before, so I was very interested to see their 'cook-down' process. The smell was incredible and the cook time was efficient. You just really had to make sure that everything was tender. Chef(s)said the easiest way to tell was to actually squeeze the figs and even taste one. No one complained about either of those. Both the uncooked dough and cooked filling were set aside to chill until we could use them (ie: Tuesdays class).

Just two more tasks to complete and that would be a wrap on week two. We grabbed one of our Pate Brisee doughs from the refrigerators and proceeded to roll it out 'galette' style. Ms Jones you say, what in St Honore's name does that mean?! Galette style means rustic, free form, or plainly, not using a tart ring. Think thin crust pizza style. Then we hand (or finger) folded the edges into themselves using an egg wash as a 'glue' to hold the edges down. FYI: basic egg wash is 1 egg, 1 egg yolk, and a pinch of salt. The galettes were hotel wrapped and put back into the fridges to chill so we could use them on Day 7.

The final project for this Saturday afternoon were the Tartlettes auz Fruits Frais. The four tartlette shells that were rolled and chilled on Thursday, and cuire a blanch this morning had sufficiently cooled enough for us to handle them. We took some of our Creme Patissiere from Thursday and also made a Creme Fouettee out of some heavy cream. Again, that process involved a lot of wrist grease I suppose you would call it, to hand whip the heavy cream with a balloon whisk until stiff peaks form. The Creme Patissiere was smoothed out through whisking and lightly flavored with liquor. It all depends on your personal palatte. The type of liquor or even use of liquor in general is totally optional as is the case in many of the recipes that include some sort of spirits. The Fouette was folded gently into the Patissiere to make a Creme Legere. The Legere was placed in a pastry bag and then piped equally into the four tartelette shells. Decoration was free range again with a selection of fruits including orange, kiwi, strawberries, and blueberries. The most important thing about the decoration though was that each tartelette had to look the same! I fashioned a topping of all the fruits that looked like a blossomed flower. Pictures are on their way, lol...I promise! Each tartlettte got a nice apricot nappage on top and they were ready to transport home. If you were going to serve them right away, no nappage would be necessary, but you could dust them with a bit of powdered sugar.

Tartelettes!


Carrying everything home was and still is a daunting task. Although I must say I enjoy seeing how wide people's eyes get when I pass them with a plethora of sweets in my scrawny arms. I am still on a high each time I leave the FCI building. I know my heart and mind are in the right place.

Week Three is next...Onion Tarts, Sanitation Exams, and giggling over Chef Tim...

Monday, September 3, 2007

Week One at the FCI

I know this is a bit behind gang...


Tuesday 08/14

-DAY 1-
Basically when we got there, we were assigned a locker. From there we changed into our uniforms, then headed straight to the classroom. Chef Cynthia was going over some policies as it relates to dress, etc. I can't wear my labret stud, but
i'm ok with that. Just a health hazard and I guess they don't allow any facial jewelery at the school overall. SO i can do without it. We got explanations that we can start coming in the room 1/2 an hour before class actually starts, so for us that's 3pm Tuesday and Thursday and 8:30am on Saturday. Depending on our cleaning/organizing duties for that particular day or how long it takes us to get our things in place, we might need that whole 1/2 hour. Because we start PROMPTLY at the class scheduled start time.

So we went around and got to know the kitchen a bit, weekly duty descriptions, table numbers, etc. Went over our tool kits, which has just about everything we're going to be needing. Actually, most of the things I already have at home, so it was nice to see things that I was already familiar with. I've already marked mine with green and white stripes. teehee.

A quick bathroom break and tour of the school (including where we pick up family meals if we want) and we went straight into demo/lessons. There's a demo part of the class, where the instructor actually makes what we're making. Then we split off and make it either individually or in teams of 2.She talked about the flours we use and why we use them (ie: 'bread flour breaks and cake flour cakes' - relating to gluten content) She made her Pate Sucree and then we had a couple minutes to get our Mis en Place (things in place) and make a batch of our own. Its like reading and regurgitating with cooking really.

After clean up from Pate Sucree, she demo'd the apple compote. Every day when we come in they'll outline the day on the marker board. Just so we know which recipes we need to have studied and what tools we'll be needing so we aren't digging for things constantly. Another huge factor in the kitchen is organization. So once her demo was done, we got out MeP and did it ourselves. Clean up was after that and before I knew it, it was 9pm. Whew.

I really like our Chef instructors. The Sous (Chef Toni) learned everything she knew about pastry after she got her classic culinary degree at the school. She learned under Jacques Torres and the woman who is the main pastry chef at Bobby Flay's restaurants. She reminds me ALOT ALOT ALOT of Dr. Bailey on Grey's Anatomy. Super intense, but teaches insanely well.

Chef Cynthia after years of bouncing around in restaurants, taking time off to have a family, doing catering and cakes for Caroline Kennedy's wedding and all her children's christenings...then starting her own custom cake business, started teaching at the school 3 years ago. She's a bit more passive than Chef Toni in demeanor, but will also be such a great person to learn from. Her website is http://www.cakeline.com

Thursday 08/16:

-DAY 2-
Thursday's class ran over time as well, but it was well worth it. We started off class rolling out the pate sucree dough into tart shells and then left them to chill in the fridges. That day was also heavy on the lecture, because we had one of the Italian studies instructors (Chef Guido...yes that's his real name) come in to start in on the Serv-Safe training. This is different than the Food Protection course for NY State, so thankfully I'm working my way through that as well. Its really interesting learning the biology behind food borne illnesses and that the biggest disease carrier is the human body itself. More importantly I'm glad to learn how to prevent things like those from occuring. Kind of like the method behind the sanitation madness. So that lasted from about 4 till 6. When the lecture was done, we had a demo of Pate Brisee (Broken Dough). This is really a shortbread, really crumbly texture when its mixed together. We actually made it by hand, no mixers or anything, which was super fun. I like being able to watch things come together. Cold butter is cut into cake flour, sugar, and salt until the crumbs are the size of small lentils or peas. Then a minimal amount of water is added just to bring the dough together. It looks like damp sand, but when it it refrigerated, the crumbly flour is absorbed by the butter and it will turn out a workable dough.

I noticed that it took me longer than just about everyone else to do my dough, but I think that the time I took really helped me understand what its supposed to look like. Baking is not a race and the people that were hurrying when they are just learning ended up with horrible product.

After our dough was made and chilling, we did a demo for filling the apple tart. We took the shell, put the apple compote in the bottom of it then thinly sliced apples for the top and center. After they were placed, which was a task in itself (like stacking a house of cards) we sprinkled vanilla sugar on it then it was ready for baking.

After the tarts were ready to be baked, we demo'd the Creme Patissierie. Its really not a difficult thing to do, but it takes
perfect timing and speed to do it right. We had to boil whole milk, sugar, and vanilla on the stove, then combine our other ingredients (sugar, eggs, egg yolks, and pastry cream powder) well JUST BEFORE the milk came to boil. Now the cold mixture had to be added with the hot...but because there was eggs in it, we had to temper it. Meaning part of the hot liquid had to be added to the cold mix while whisking constantly. once the cold was brought up to temperature, it can be added to the hot and put back on the stove. I finished the cream by bringing the mix to a boil and whisking constantly for 2 straight minutes on the stove. When the 2 minutes were up, the creme, which looked just like fresh vanilla pudding, was put to cool on a sheet pan in plastic wrap.

So by that time and after clean up, it was time for the apple tarts to come out and then they were finished with an apricot nappage, or apricot preserve glaze. The final product is
Its a little smashed on one side because I'm clumsy. BUT still not too bad for a novice first try.

I didn't get home till around 11pm, but it was totally worth it. That's how I've felt each time I leave school. I know its the best
thing for me. AND i'm having a blast.

Saturday 08/18:

-DAY 3-
Saturday I was up at 5am to workout and get ready because I had to be ready for class at 8:30..meaning I had to leave my apartment around 7 to make it to the building by 8 and then change and get my stuff together.

Before things started 'officially' at 9, I had one more Pate Sucree dough to roll out and chill because we would be using it later on. It was more sanitation lecture for the first couple hours...then we went straight into baking the shells we rolled out. After those were in the oven, we demo'd and then made dough for Gingersnaps. So the gingersnap cookie dough was made..then it was straight into the filling for our banana cream tarts. Nothing like whipping cream by hand to strengthen your forearms, lol. Once again, I was the last one to finish BUT my banana cream tart looks great:

Someone on the street addressed me as 'chef' when I was carrying it home...i giggled.


Up next....Week TWO!!!!!!